Thursday, November 24, 2016

Happy Thanksgiving


I hope everyone is having a great Thanksgiving!  I certainly am!  But this time I am extra thankful.  I haven't been around much because at the end of August I was diagnosed with.... Lung cancer. I quit smoking quite some time ago but apparently not soon enough.  Since that time, all thoughts of miniatures and any other craft has been the last thing on my mind. All  I have done is read and watch TV. Then on October 25, I had surgery to remove the tumor and lymph nodes.  The greatest blessing I received was being told it was Stage one cancer and had not spread!  I would have done a happy dance but needless to say I was in a lot of pain. My follow up went very well and was told I could go on a few side trips if they were short.  So my hubby took me to Ron's Miniature shop in Orlando.  That helped get my mini mojo back big time.  Hopefully I have something to post about before Christmas.  I also have to mention that my sons. sisters and friends all rooted and prayed for me, especially my daughter and husband.  My daughter came down not only to help me but my husband also.  Poor guy.... he needed to lean on someone also because neither he or I have been through anything like this.  So if all goes well in another 21 months I will be considered cancer free.  Time can't go fast enough!

Till next time

Diane

Thursday, August 11, 2016


Hello again!  I bet you didn't expect me to post again so soon.  Well, I decided to tell you a few things now instead of later because some of this is kind of interesting and I'm not sure when I'll blog again.

That is IF I blog again.

Since I downloaded Window 10, I have had a bad time with Blogger and Pinterest.
Anyone else having problems ??  Some of my links are broken and I don't seem to be able to add new ones. So it looks like people may have to copy and paste for a while.

Has Pinterest changed their format?? Definitely don't like it. My name is gone and I tried to add my profile picture and that did't work either.  Oh well.


This first note may be important to new polymer clay people. About 3 weeks ago, I made some cupcakes but had no room on my baking tile so set them on a piece of styrofoam to wait for the next round of baking.  Went to find them and they were gone. And here is what happened:

There must have been some chemical reaction because they had sunk down about 1/2 " into the styrofoam.  Here's the underside of the styrofoam.
Good thing I keep my ceiling fan on all the time.

Now on to nicer stuff.

I made an easel to show of a really nice painting I'll be putting in my Mariner Shop.  I was pleased with how it turned out and it does actually fold.


I also got a new toy.

I know I'll use the magnifying glass a lot ( when I start needlepoint again) and maybe the clamps.  The clamps are very tight so I need to be careful on how I use them.  I have seen this for sale in a catalog for $17 but this one cost only $5 at a store called Harbor Freight Tools and they are nationwide.

Every now and then, I come across a blog that I like to let people know about because they make such neat stuff.  I follow all 4 of these because I like what I see.


The next two are by the same blogger.

http://thekinfelddollhouse.blogspot.com/
naturessoulminiatures.blogspot.com/

And finally:

http://shenandoahandstuff.blogspot.com/


Well, I'm off again.  This time to watch the Olympics. My apologies that this is such an uninteresting post, but it will be better next time.

Enjoy the rest of the summer!

Diane


Wednesday, July 27, 2016


Like a lot of people, I'm asking myself, "where did the summer go?"  It's hard to imagine but some schools in our area start up again in two weeks.  Since my last post, we did take a month long vacation and visited with family and friends and had a great time.  When we got back, I was still in vacation mode so didn't make any minis until 2 weeks ago.

One of the first things I did was to buy a bunch of furniture my husband found for me at the Dollar Tree.  House of Miniature quality it is not but the scale is fine and the wood isn't bad either.  The down size is the gluing.  All over the place.  It's a good thing I wasn't going to stain anything.  

The style I'm going for is basic county with a distressed look.  I ended up buying 14 pieces, mainly of the two styles of tables.These will help a lot as far as displays in the candy shop go and should work out just fine.

The next mini I made were chocolate roses. I did have to practice because they weren't anywhere near the same size.  


Once I got the size right, I made this:


Except for a few more jars of candy, that's about it.  Not much, I'm afraid.

I'll be putting the candy shop on hold for a while.  I don't want to do much more until I finish up the floor plans for the shop. A friend of mine is a woodworker and has generously offered to cut them out! Thought that was very nice of him.

So now it's back to the Mariner shop.  Hopefully, I'll have a lot more to show.

Til next time!
Diane

Monday, May 23, 2016

The Mariner


The official name of the nautical shop is "The Mariner".  The name Nautical Shop didn't "roll off my tongue" just right.  Besides that, it reminded me of The Nautilus in  "20,000 Leagues Under the Sea" by Jules Verne.  I loved the original movie but somehow it just didn't fit.

As it stands now, part of the shop will be boating and fishing equipment and the other side will be home decor. Very little done with the equipment and fishing stuff, but I haven't done too badly with the decor part.

This is a picture I have in my den and one of my favorite possessions. It is by an artist named Letterman but I can't find out much about him.  It's approximately 42" by 60"-- very large.

I did find it on the internet and made it in two sizes.  It will be hung above a fireplace but not sure what size I'll use.


This picture is some wall hangings that are similar to what I offered in my giveaway some time ago.

As usual, I suck at taking pictures so the next ones aren't too great.  As part of the home decor, I used some shells as wall hangings.  This one side of the display....


and here's the other side.  The two top shelves are sea glass!  And the bottom shelf has a variety of shells.


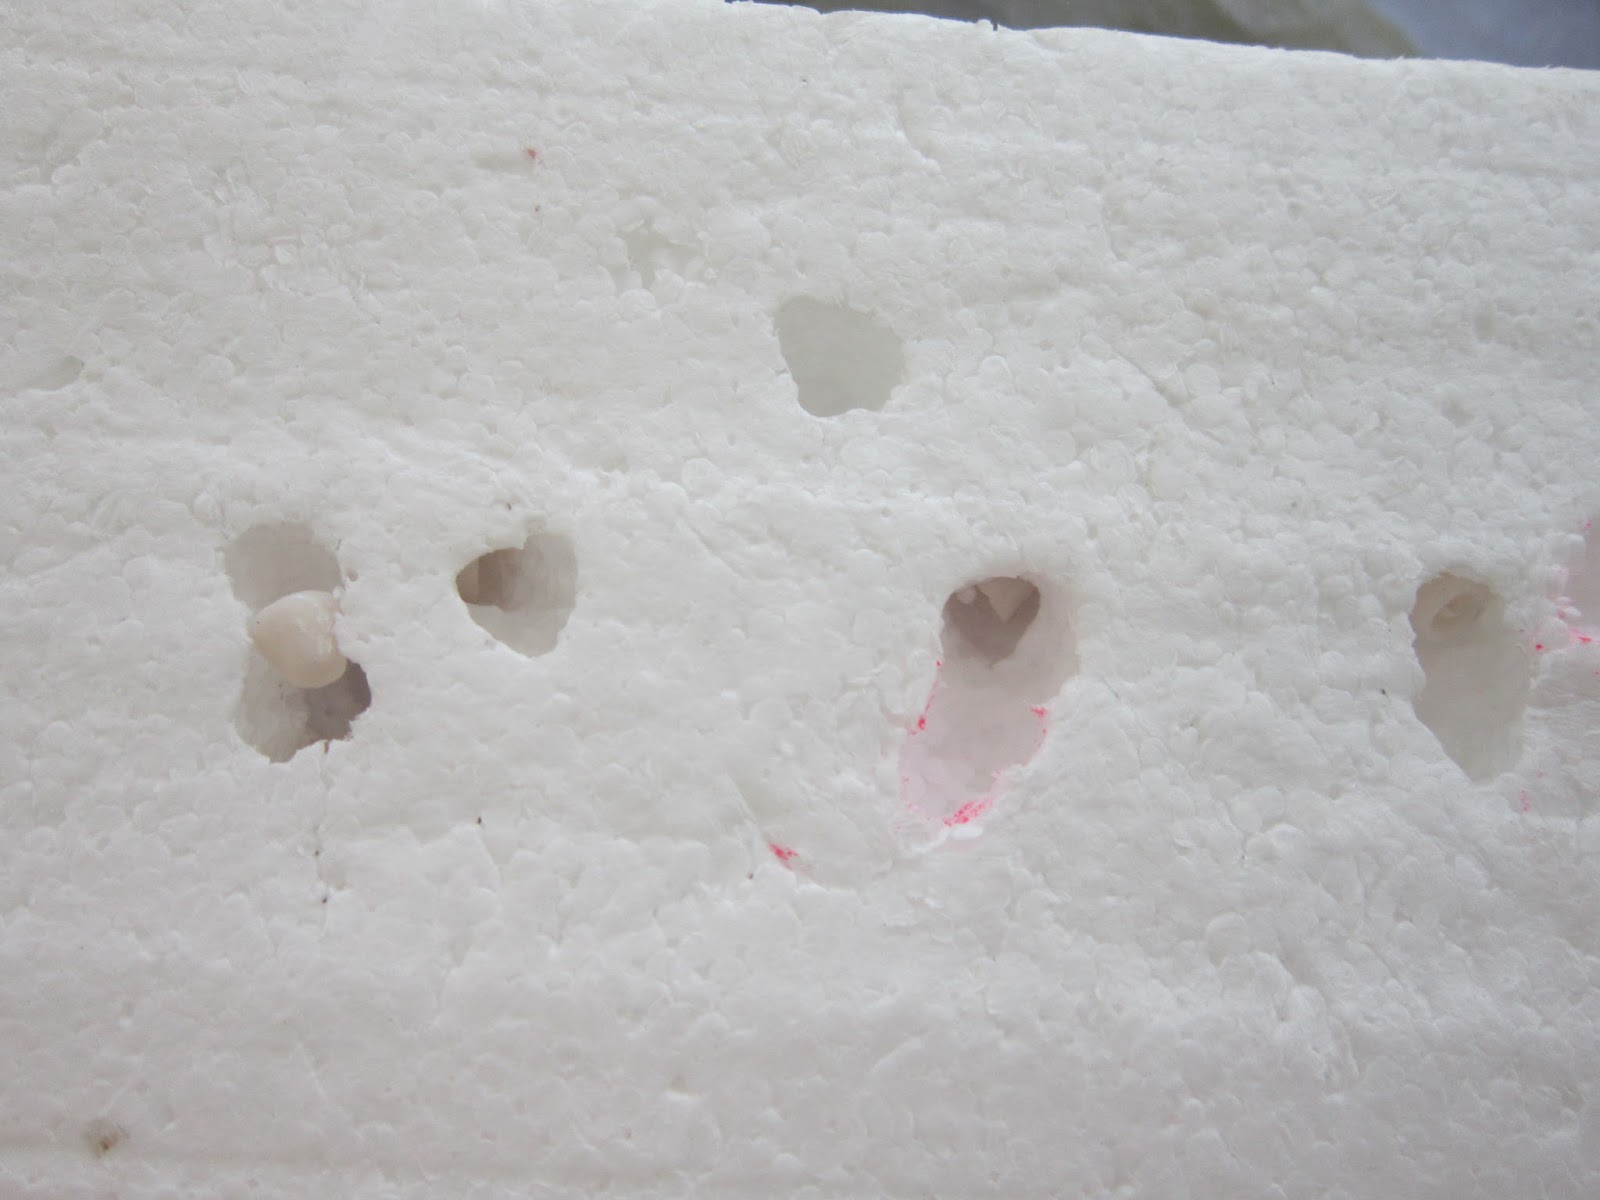
To make the sea glass. I took some plastic beads, sandwiched them between several layers of paper toweling and began pounding away.  And I do mean pounded... no "tap, tap, tap " here!


Sea glass can be found at Ft Bragg, Ca. Years ago, many municipalities dump garbage into the ocean, including glass.  Then Mother Nature did her thing and turned the glass into beautiful pebbles. But as of August 2015 it became illegal to remove any sea glass, at least from this particular beach .  That took the wind out of those who made jewelry and crafts but all is not lost!  There is always beach glass.

Beach glass is broken up glass that is tossed into a machine similar to a rock tumbler.  Some of the jewelry that is made is gorgeous and I for one cannot tell the difference.  By the way. occasionally beach glass can be found on fresh water beaches like Lake Michigan.

Last picture.  I showed these before but they have undergone a little bit of a change.  The decal edges curled up slightly but I don't think I fix them.  Makes them looked a little weathered.

I hate to post and run but vacation is coming up soon and I'm starting my packing early.  Plus still need to do a few things around the house.  So till next time, take care!

Diane

Saturday, April 30, 2016

Candy...again


Polymer clay can really be addictive and it was hard to put it away....only for a while. But not before I made these suckers on a stick.   This was my chance to use up all my little bits of clay before I broke open a new pack.  The picture isn't very good but they are quite colorful. I made extras so some will go into my printer's tray


Rock Candy

 I actually made some realistic looking Rock Candy, quite by accident. When I found out my grandkids were coming down, I went to a kids arts and craft website in case we needed something to do on a rainy day.  I came across a craft where the kids could make their own "geodes" using metallic pipe cleaners and a solution of Borax ( a laundry booster).  So I did a trial run and this is what I came up with:


The crystals were huge! I had left them in the solution far too long. But one look at them and I'm thinking.... Rock Candy! I had a lot the solution left so I re-heated it, added blue food coloring just for the heck of it and used cloth covered wire.  The shape turned out great but that was about it.

From the picture below you can tell that the solution went way up the cloth (wicking) and the crystals started forming there.  By the time all was done I had a stick of candy nearly an inch tall which means about a foot tall in real life. An hour later all the color was gone.


I decided to go with my original plan.  Wrapped in several layers of paper towels, I started pounding away.  No light tap, tap, tap.  Had to use a little bit more power because the crystals were very hard.
I did get a lot of powder so I dumped it into a strainer.  Any thing that went through got tossed out

Paint some wire light brown, let dry, then add glue to one end, dip that end in a layer of the smallest crystals.  Let dry and repeat the entire process two more times.  I ended up with this:


They look much better than the picture shows and I was very pleased.  The thing is I don't like Rock Candy.  Pure sugar with no flavor.  But they are unique and kind of pretty.

The last thing I made was fudge.

Walnut:


Pistachio:


I also made traditional fudge with no nuts but didn't take a picture of it.  Now some of you may roll your eyes at this. but for the nuts I used real peanuts.  Washed and dried them, put them in my nut chopper and stared chopping away.  I rolled the fudge in the peanuts and baked as usual.  Worked great.

With all this candy making, I didn't forget about my nautical shop.  I have made a few thing that I'll show you in my next post.

Take care

Diane 


Saturday, April 16, 2016

Candy


 This is going to be a rather short post but I wanted to show you a display of some of the minis I'll be using in my Candy and Bake Shop (along with some cake pops I didn't finish in time for my last post.)  I have red and black licorice, gumballs, candy canes, hard candy chunks, and stick candy. The plate on the bottom shelf is a variety of chocolates that I received in a swap. And then the cake pops.

On this candy stand are chocolate fudge, caramels and peanut brittle.

I think I over did it on the caramels


Making peanut brittle was accident that turned out very well.  I just bought some TLS and wanted to experiment with it a little. I took some carmel colored Fimo, chunked it up and added TLS--far too much. It came out a little thin but the color was good. I then added some yellow and there it was- peanut brittle (minus the peanuts) I also had some pale yellow fimo already baked so I cut into small chunks, mixed it up and now I had peanuts. Some of the peanuts are kind of large but at least there is no doubt as to what it is.

Then I came across some no-hole beads and thought that would be a better option for the peanuts. After mixing up another batch of Fimo, I tossed some in and came up with this:

I'm not sure how those big chunks got in there but I just cut them out. Probably used the same mixing cup.  I actually like the first batch better but will probably use then both,

After my next post, I'll be putting the fimo away for a while.  I have to start making some decent displays and tables not to mention figuring out what size roombox I need. I sure am keeping busy!

Have a wonderful day!

Diane

Friday, April 1, 2016

Cakes and cookies...and other stuff

I think I have enough minis to make a candy/bakery shop!. That is something I have always wanted to do, so why not now?  This will be a works in progress for a while.

First, I need to make a roombox, then decorate it and make some display tables, shelves, etc. So I have a lot to do. But I took some pictures of what will be going in it. I got together some of the mini foods that I have made, received as gifts and some from swaps.

Cakes and cookies:

I love this pink wedding cake. Received it in a swap several years ago.


I still have 5 more cake to show but not ready for pictures yet.


I'm sure most of you have seen this bunny cake. It was fun to make because it brought back many sweet memories.  My kids and I made this for Easter for many years.


Not much in the way of cookies just yet, but I have plans for a few more. I decided to show some other deserts on this same table because they are one of a kind.

                     
About macarons.

I have never seen a macaron up close and personal so I did a little research. I thought they were more of a cake type treat but some websites consider them a cookie.  Other websites just call them a confection.  Either way, they look delicious!

I did watch several videos on how to make them but then came up with my own method.  ( I don't think anyone has done them like this before)

First, I cut out a "plug" 1/4" wide and less than 3/8" tall. ( A little too tall now that I look at them)


Next, I took a needle and drew 2 lines close to the center, like this:


Then, I textured above the first line and below the second line,


Not to bad for my first attempt.


I hate to post and run but I hope you enjoy the pictures.
In my next post, I'll show all the candies I have made and a few odds and ends. Till then, take care!


Diane